Habits are the compound interest of self-improvement.
James Clear – Atomic Habits
Why Automate?
We all probably know by now that relying strictly on willpower is not a reliable way to reach our goals. Instead, we are better served by carefully designing a system and building habits. This system can nudge us in the direction of desired behaviours that eventually lead to desired outcomes. This article lays out the system I designed over the years to achieve my financial goals. More specifically, we will focus on how I automate my finances as a grad student. This post was inspired by Ramit Sethi’s blog post & book.
Before We Start
Automating your finances requires a few building blocks to work smoothly. First, you need to earn more money than you spend. If this is not the case for you at the moment, don’t attempt to apply the concepts in the rest of this article. You would be better served by brainstorming ways to boost your income streams and identifying ways to cut back on spending. This doesn’t mean however that you can’t take advantage of automation by paying yourself first and automatically investing 10% of your income. The system below simply takes the paying yourself first to the next level. Second, it is strongly advised to set up an emergency fund with 3-6 months of salary before you start implementing a fully-automated system. In the early days, however, you can use basic automation features to build up your emergency fund.
How To Automate?
Case Study
Figure 1 shows a rough approximation of my income and spending patterns as a graduate student. I managed to earn about 47 000$ this year with the help of tutoring, being a teaching assistant, paid co-op positions, scholarships, and summer jobs. I thought this was an especially good time to write the article since the income of a grad student is close enough to the median Canadian income. Furthermore, grad students’ revenue streams pose the additional challenge of being inconsistent. My system needed to be flexible enough to accommodate the natural ebbs and flows of the gig economy. You can think of the spreadsheet below as how my money flowed during an average month during my master’s degree.

The specific numbers and money endpoints are somewhat irrelevant and specific to my financial goals given my situation. The flowchart below (Figure 2) generalizes the results of the spreadsheet by converting the amounts to approximate percentages. You can think of the percentages in the flowchart below as where each dollar of your next hundred dollar would end up. For me, the entire 100$ would flow to my checking. From there, 50 of those dollars would go towards expenses, 30$ would flow towards my savings goals, 15$ towards my long-term investing goals, and the other 5$ would stay in my checkings for any future expenses or goals.
You can adapt the flowchart to your needs by inputting your income and changing the nodes and percentages as you wish. You might find value from drafting such a flowchart for how you are currently spending your money and another one for how you actually want to spend your money.

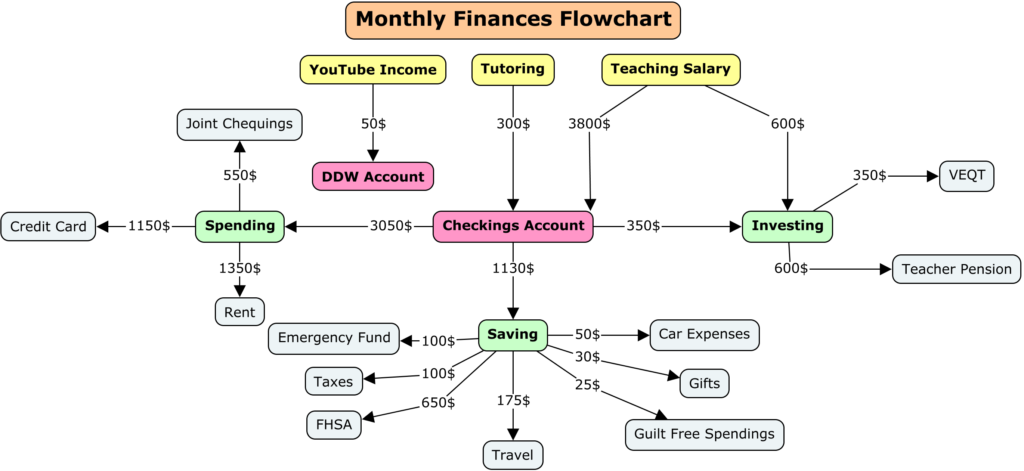
Note that the system above is roughly 400$ short each month. This 5000$ yearly deficit is overcome with summer job income, birthday and Christmas gifts, or any other contract work.
Step 1: Income Dump
Decide on a location for your revenue streams to flow into. I always set up an automatic direct deposit to my checking account so my employers can pay me without me having to physically go to the bank or scan checks. Ideally, your checking account would have no fees and would even pay you a little interest. There are many options out there for such accounts. My checking account is currently with one of the big Canadian banks. It doesn’t offer interest and the fees were waived since I am still a student. I’ll probably want to relocate my checking account once I graduate if the bank starts charging fees. Ramit offers some scripts in the book we can use to call the bank to ask to get our fees waived.
[UPDATE 2022-05-15] I tried to get my banking fees waived at my big bank but did not succeed. I ended up opening a zero-fee checking and a few high-interest savings account with Simplii Financial. Use my link and we can both earn $50 when you open and use an eligible account with Simplii.
It is from this main pool (your checking account) that your money will flow downstream. I like to keep a balance of around 3000$ in my checking account to ensure that the pool never drys up which would cause the whole system to break down. If you don’t like the idea of keeping 3000$ in your checking account, you can also line up your payment dates and bill dates so the system can operate more tightly. You can read Ramit’s article or watch his video for more on how to implement the dates synchronization approach. Personally, I prefer to tradeoff a system that might be slightly less efficient for a system that is much more robust to the chaos of life.
Step 2: Long-term Investing Goals
Note that a percentage of your income might automatically be invested in your pension and matched by your employer. The traditional advice is to take advantage of this. Just keep in mind that the flow chart above had 100% of my income flowing into my checking account but when I start contributing 5% to a pension, then only the remaining 95% of my income reaches my checking account. This is a good thing because it cooks the Pay Yourself First principle into your system before you even see the money.
For many (including me), the goal of investing is to ensure that we have enough money when we retire. Therefore, one has to figure out how much money is “enough”. Although the 4% Rule isn’t perfect, it can give us an estimate of how much we need to have saved to safely retire and keep up a certain standard of living. The rule suggests that we can “safely” withdraw about 4% (probably a little less) of our portfolio each year with a low risk of running out of money before we die. Let’s say that I decide that living on 60000$ per year in retirement is reasonable. We can use the 4% Rule to reverse engineer the total amount needed in my portfolio when I choose to retire. Dividing 60000$ by 0.04 gives us 1.5 million dollars. Next, we can play around with this calculator offered by the Ontario Securities Commission to figure out how much we need to invest and how much risk we have to take to reach our financial goals.
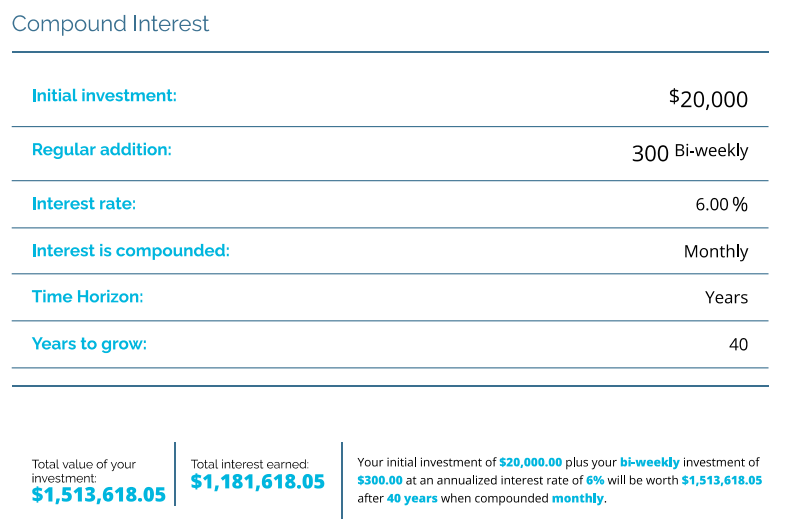
Figure 3 tells me that I need to invest roughly 300$ bi-weekly and achieve an average return of 6% over the next 40 years to retirem with roughly 1.5 million dollars in my investment fund. This seems realistic and has some wiggle room. The beauty of this approach is that this 7800$ per year (300$*26) can grow tax-free if invested in a TFSA and RRSP. In other words, maxing out your TFSA and RRSP is a great strategy to ensure a wealthy retirement. My career trajectory is to become a high school teacher. Teachers in Ontario are know to have great pensions. The investment fund would supplement my pension income. I think they call this investment fund the Get Rich Fund in The Wealthy Barber. Of all goes well, I may still be able and willing to earn income in retirement which would further decrease the amount needed in my Get Rich Fund.
The easiest way to start investing is to call your bank and set up automatic contributions to some type of mutual fund. A cheaper alternative is to use a robo-advisor such as Wealthsimple Invest. This robo-advisor has an MER of 0.5% at the time of this writing which is significantly lower than most funds offered by big banks in Canada. If you want to cut the fees even further, you can take a Couch Potato approach. I personally invest in an 80% stocks and 20% bonds Vanguard ETF (VGRO) using Wealthsimple Trade. Money gets automatically added to my trading account each month and all I need to do is buy the number of shares that fit my budget. This approach takes five minutes a month or about an hour per year since the fund is rebalanced automatically. One can recreate similar funds and rebalance manually if they want to cut even more down on fees. However, this method is most likely too advanced for the average investor who simply wants to “set it and forget it” for a reasonable price.
The upside of managing your investments is that your cut down on fees which can make a big difference in the long run. The downside is that you run the risk of not implementing your dollar-cost averaging strategy as effectively as a fully automated system would. Knowing yourself is key to determine the best investing strategy for you. My advice is to start simple and progress to a more advanced strategy if you feel the need. The vast majority of your results are obtained by investing. Don’t sweat the small stuff. Just get the ball rolling if you haven’t already.
Step 3: Short-term Savings Goals
Congratulations! If you have successfully implemented step 2 and stuck to it for a while, you are almost certainly in better financial shape than most. Now that the automation infrastructure is in place, you can apply the same logic to stash money aside for shorter term goals. Some of my short to medium term goals are to save for the wedding, to travel, to put a down on a house, and to pay off my student loans. It doesn’t always make sense to invest when you may need to use the money within the next five years.
Instead, you can put your money in a high-interest savings account which can (at the time of this writing) earn you 1.5% by taking zero risk. There are a few quality options out there but I’ve been using EQ Bank which lets you create up to 5 sub-savings accounts with zero fees. Most banks offer the option to create sub-savings accounts at no cost. Just set up an automatic transfer a few days after you get paid and you’ll be surprised by how aggressively you can save without noticing. It also feels great to get rewarded with free money each month for saving money.
A high-interest savings account is the perfect place to store your emergency fund. Holding 10 000$ in an account with a 1.5% interest rate would result in 150$ per year that gets added to your account (or 12.5$ per month). This is a significant sum of money. If you’re like me, I used to keep my emergency fund in an account that would earn me a few cents per month.
The person who carefully designs their daily routine goes further than the person that negotiates with themselves every day.
Shane Parrish
Step 4: Fixed Expenditures
Now that we’ve paid ourselves first, we can automate our bill payments. Many of our biggest expenses are relatively stable from month to month if not identical. Just think about your phone bill, hydro, wifi, rent, insurance, gas, food, gym membership, Netflix, Spotify, and whatever else you may be subscribed to. For me, my fixed credit card expenses add up to roughly 1000$ per month, not including rent. That said, I can automatically put away roughly half of my paychecks to go toward my expenses. You can automate the payment of most of your fixed expenses by paying with a credit card. That way, you can collect rewards, easily track your spending, and have the confidence that you have the money to pay your fixed expenses at the end of each month. I personally use Neo‘s credit card since it has no fees and offers great rewards (upwards of 1%) that fit my lifestyle.
Step 5: Guilt-free Spending
The best part about automating the flow of your money when you make more than you spend is that you can do whatever you want with the money left over. I have a sub-savings account called “Guilt-free Spending” for this exact purpose. Many pretend to spend their money without guilt but these same people often constantly stress about their money situation. It’s much easier to spend without guilt when you know for a fact that the important things are taken care of.
Keep Designing
Your system will never be perfect. You’ll never have figured out your money situation forever. The key is to start now and keep designing as you go. It’s impossible to predict the future. Your financial goals are going to change. Your income is going to change. Your expenses are going to change. Crises are going to happen. This doesn’t mean that you shouldn’t plan for your future and automate your finances. It just means that you may have to start slow and be willing to adjust your system as you go. You may have to decrease the amount that you spend, save, or invest for a while. That’s ok. It’s because you have to course-correct that you have to get off the wagon completely. Stay the course. Your future selves will thank you. Make your current system doesn’t ignore the needs and wants of your current self either. A good rule of thumb is to dedicate 50% of your income to needs, 30% to wants, and 20% to savings. In other words, roughly 80% of your income is to your present self and 20% to your future self. My advice would be to keep it simple and build in some flexibility in your system. Getting Step 2 in order is a massive accomplishment. Don’t fall prey to over-optimization. Take care of the big rocks and sleep easy. The small stuff will fall into place.
Once your money system is good enough—or 85 percent of the way there—you can get on with your life and go do the things you really want to do.
Ramit Sethi – I Will Teach You To Be Rich
Read This Next
- What is your Investment Goal?
- The Wealthy Barber – Book Notes
- Life is a Jar
- What is your Rich Life?
- Atomic Habits – Book Notes
- Build Wealth And Get On With Your Life
- What I Learned from Tracking my Mood for 1000 days
- My 10-day Vipassana Silent Retreat Experience
- The Parallel Universes of Time and Money
- The Do-Nothing Morning Routine Experiment
Affiliate Links
- High-interest savings account and zero-fee credit card – Neo
- Invest automatically – Wealthsimple Invest Robo-Advisor
- Build your own portfolio – Wealthsimple Trade
- Save money and make a little – EQ Bank High-Interest Savings Account
- Take effective book notes – Readwise
- I Will Teach You To Be Rich – Ramit Sethi
- Atomic Habits – James Clear
- The Wealthy Barber – David Chilton
- 7 Habits of Highly Effective People – Stephen R. Covey
- Tiny Habits – BJ Fogg